

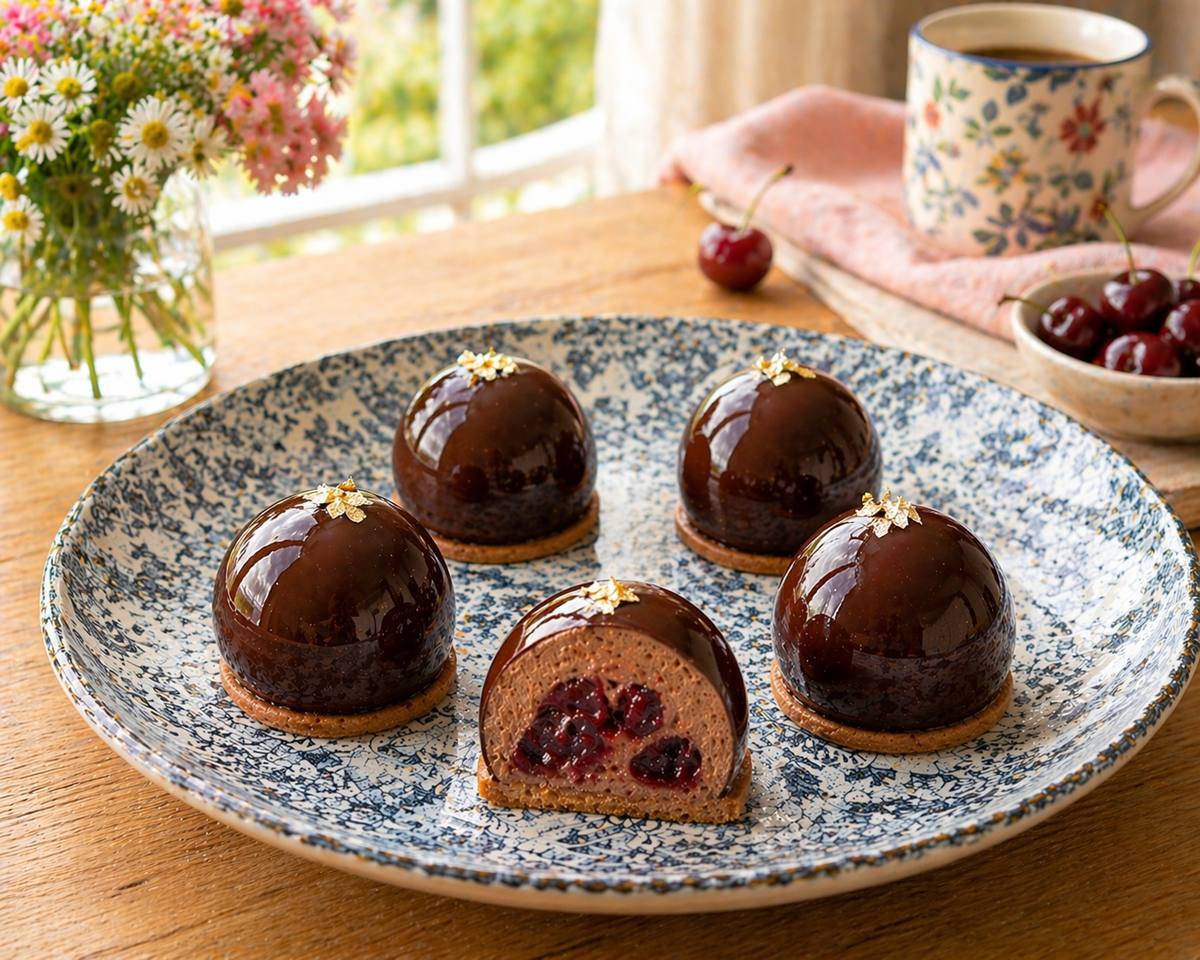
BLACK FOREST MINI ENTREMETS
Black Forest mini entremets with chocolate mousse, Griottines cherries and hazelnut crunch, finished with a glossy mirror glaze.
Black Forest cake is one of those desserts that feels instantly familiar — chocolate, cream, and cherries brought together in a combination that has endured for generations.
In this mini entremet version, those same classic elements are reinterpreted into a more refined, modern form. Instead of a traditional sponge base, a crisp hazelnut feuilletine layer made from scratch adds texture and contrast, supporting a smooth chocolate mousse and whole Griottines cherries at the centre. Finished with a glossy chocolate mirror glaze, each component is distinct yet balanced.
The result is a dessert that feels both familiar and new — rooted in tradition, but shaped by contemporary pastry techniques.
If you’re interested in how desserts like these have evolved, you can explore the rise of mini cakes and their growing popularity in my article, The Rise of Mini Cakes.
If you would like to explore the origins of this iconic dessert and how it became a global favourite, you can read the full history here: A Slice of History: The Origins of Black Forest Cake.
If you prefer the classic layered version, you can also explore my traditional recipe here: Classic Black Forest Cake Recipe
RECOMMENDED TOOLS & TIPS
Working with mini entremets is all about precision, layering, and timing, and a few tools will make the process far more manageable.
Silicone Moulds are essential for achieving clean, uniform shapes and allow you to unmould the frozen cakes effortlessly before glazing. I used this 15-Cavity Semi Sphere Silicone Baking Mould to make these mini entremets.
A small Offset Spatula helps spread mousse evenly and smooth the surface without disturbing the layers.
A Digital Food Scale ensures accuracy, especially important when working with mousse.
A Food Processor is needed to transform caramelised hazelnuts into praline paste and textured crunch.
I used Griottines Cherries as they add a deeper, kirsch-infused flavour that enhances the classic Black Forest profile without additional preparation.
For a smooth mirror finish, glaze the entremets while fully frozen and ensure the glaze is at 32–34°C before pouring. If the glaze is too hot (above ~35°C), it becomes too thin and runs off, leaving a light, uneven coating. If it is too cool (below ~30°C), it thickens and won’t flow smoothly, resulting in a dull finish. A Digital Food Thermometer is useful here to check the temperature accurately before glazing.
When working with delicate finishes such as gold leaf, a pair Food Tweezers makes the process far more controlled and precise. Gold leaf is extremely light and fragile, and handling it directly can cause it to tear or stick to your fingers. Using tweezers allows you to lift and position small pieces gently onto the glazed surface without disturbing the finish. Apply the gold leaf once the glaze has set but still has a slight natural stickiness, so it adheres cleanly while maintaining a smooth, glossy surface.
STORAGE & SERVING TIPS
Store the finished entremets in an airtight container in the refrigerator and consume within 2–3 days for the best texture and flavour. This helps prevent the mousse from absorbing fridge odours and keeps the glaze looking fresh.
For longer storage, keep the entremets frozen (preferably unglazed) for up to 2 weeks. Place them in a single layer in an airtight container to avoid damage. When ready to serve, glaze directly from frozen for the best finish, then allow to thaw in the refrigerator.
Once glazed, avoid freezing again as this may affect the shine and texture of the mirror glaze.
Serve the entremets slightly chilled rather than fully cold. Remove from the refrigerator and let them sit at room temperature for 10–15 minutes before serving. This allows the chocolate mousse to soften and the flavours to become more pronounced.
For clean presentation, use a warm knife (wiped dry between cuts) if slicing, and handle gently to preserve the smooth glaze and defined layers.

BLACK FOREST MINI ENTREMETS
Ingredients
- FOR THE HAZELNUT FEUILLETINE CRUNCH (FROM-SCRATCH PRALINE)
- 200g sugar
- 2 tbsp water
- ¼ tsp lemon juice
- 300g raw hazelnuts
- 60g milk or dark chocolate, melted
- FOR THE DARK CHOCOLATE MOUSSE
- 300g dark chocolate (60–70%)
- 400ml whipping cream
- 4 egg yolks
- 60g sugar
- 100ml milk
- FOR THE CHOCOLATE MIRROR GLAZE
- 4 tsp gelatine powder (~12g), bloomed in 2½ tbsp cold water
- 100ml water
- 200g sugar
- 65g cocoa powder (unsweetened, sifted)
- 160ml heavy cream
- FOR ASSEMBLY & FINISHING
- 30–45 Griottines cherries, drained
- Edible gold leaf
Instructions
- 1
Prepare the workstation. Gather all the tools and ingredients.
- 2
PREPARE THE HAZELNUT FEUILLETINE CRUNCH
- 3
Preheat the oven to 170°C. Line a baking tray with baking paper.
- 4
Spread the hazelnuts in a single layer and toast for 10–12 minutes until fragrant and lightly browned. Set aside.
- 5
Combine the sugar, water, and lemon juice in a saucepan. Heat over medium heat and allow it to boil without stirring until it turns a deep amber caramel.
- 6
Remove from heat and quickly add the toasted hazelnuts, stirring to coat evenly in the caramel.
- 7
Pour onto the lined tray and spread into a thin layer. Allow to cool completely until hardened.
- 8
Break into pieces and place in a food processor. Pulse briefly to create coarse praline pieces.
- 9
Set aside 5–6 tablespoons of these coarse pieces for crunch texture.
- 10
Continue processing the remaining praline until it turns into a smooth hazelnut praline paste.
- 11
Mix the praline paste with the melted chocolate until smooth.
- 12
Fold in the reserved coarse praline pieces to create a crisp, textured crunch layer.
- 13
Spread into a thin, even layer between two sheets of baking paper.
- 14
Chill until firm, then cut into 15 discs to fit your silicone mould cavities.
- 15
PREPARE THE CHOCOLATE MOUSSE
- 16
Melt the dark chocolate gently over a bain-marie until smooth. Remove from heat and set aside, keeping it slightly warm.
- 17
Heat the milk in a saucepan until just steaming, but not boiling.
- 18
In a separate bowl, whisk the egg yolks and sugar until pale and slightly thickened.
- 19
Slowly pour the hot milk into the egg mixture while whisking continuously to temper.
- 20
Return the mixture to the saucepan and cook over low heat, stirring constantly, until it thickens slightly and coats the back of a spoon (custard stage). Do not boil.
- 21
Immediately pour the hot custard over the melted chocolate and stir until smooth and glossy. Allow to cool to about room temperature, until just slightly warm to the touch.
- 22
Whip the cream to soft peaks (the cream should hold its shape but still be smooth and slightly fluid).
- 23
Fold one-third of the whipped cream into the chocolate mixture to lighten it, then gently fold in the remaining cream until fully combined and smooth. Avoid overmixing to keep the mousse light.
- 24
ASSEMBLE THE MINI ENTREMETS (USING SILICONE MOULDS)
- 25
Place the silicone mould (15 cavities) on a flat tray to keep it stable for filling and transferring to the freezer.
- 26
Pipe or spoon a layer of chocolate mousse into each cavity, filling about halfway. Tap the tray gently to remove any air pockets.
- 27
Add 2–3 Griottines cherries into the centre of each cavity, ensuring they are well drained to avoid excess moisture.
- 28
Top with more chocolate mousse, filling each cavity close to the top. Use an offset spatula or spoon to smooth the surface evenly.
- 29
Place one hazelnut feuilletine disc on top of each cavity and press gently until level with the mould. Ensure good contact so the base adheres properly.
- 30
Clean off any excess mousse from the edges for a neater finish.
- 31
Freeze for at least 4–6 hours, or until completely firm before unmoulding and glazing.
- 32
PREPARE THE CHOCOLATE MIRROR GLAZE
- 33
Sprinkle the gelatine over the cold water and let sit for 5 minutes until fully bloomed and softened.
- 34
In a saucepan, combine the water, sugar, and cream. Heat over medium heat, stirring gently, until the mixture just begins to simmer and the sugar has fully dissolved. Do not boil.
- 35
Remove from heat and sift in the cocoa powder. Whisk slowly until completely smooth and free of lumps.
- 36
Return to low heat briefly if needed, stirring gently, until the glaze is fully smooth and slightly thickened.
- 37
Add the bloomed gelatine and stir until completely dissolved.
- 38
Strain the glaze through a fine sieve into a jug to remove any lumps or air bubbles. Avoid whisking vigorously to prevent incorporating air.
- 39
Allow the glaze to cool to 32–34°C. At this stage, it should be fluid and pourable, forming a smooth ribbon when lifted.
- 40
GLAZE AND FINISH
- 41
Unmould the frozen entremets and place them upside down on a wire rack set over a tray to catch excess glaze.
- 42
Pour the glaze over each entremet in one steady motion, starting from the centre and allowing it to flow naturally over the sides.
- 43
Ensure each piece is fully coated, then allow the excess glaze to drip off on its own. Do not spread or touch the surface.
- 44
Gently remove any excess glaze from the base if needed for a clean finish.
- 45
Transfer to the fridge and allow the glaze to set.
- 46
Let the entremets thaw slightly in the fridge before serving.
- 47
Finish by carefully placing a small piece of gold leaf on each entremet using food tweezers.
Featured in our shop: Oven Thermometer